Car Side View Sketching - Beginner
1) Setting up
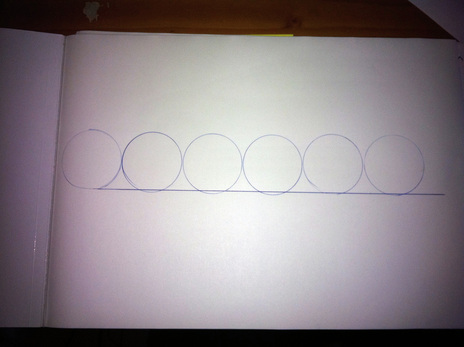
This is the first and most important stage...
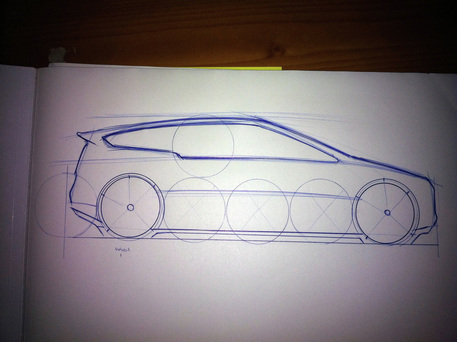
Draw out some circles on a base/ground line, mine are not always THIS neat, I'm using circle guides here to keep things a bit clearer for you to see, usually they are very scruffy, but it doesn't matter anyway, I would usually do these much lighter as they are just reference.
For most cars if you draw 5/6 out you should be fine. Once you get used to doing this you can just judge it by eye without the need for them all.
2) Wheelbase
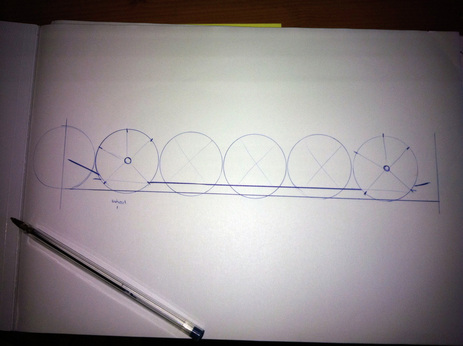
OK so this is the reason we have the circles.
The circles are used to measure the proportion of the car
For an average sized vehicle, say a Ford Focus or Audi A4, and most sports cars too, using 3 circles between your wheels works just fine. So you can see I have marked which 2 are my front and rear wheels, the 3 circles in between give me a good base proportion, and as a rule I usually use about half a circles width either side of the Wheels front and back for the outter-most part of the body ( See pics below) The line I have drawn across the bottom represents the bottom of the car.
3) Basic Shape
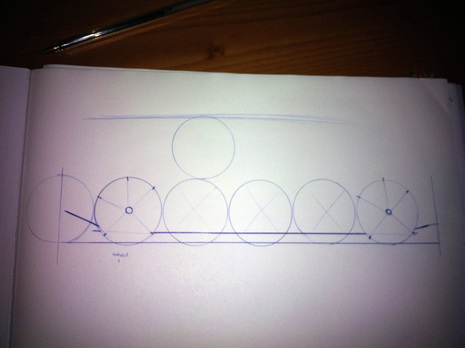
The same rule applies for height of a vehicle. For this sized vehicle I use just one wheel height for maximum, but it is only a guide. I would suggest printing out some sideviews of different types and sized cars and drawing proportion wheels all over to see how each varies. Or just open them up in Photoshop and use the selection tool, save them for future reference though.
(I never did that, just thought of that now actually, would have been handy)
Anyway mark in a horizontal line across the page to show your max height.
(I never did that, just thought of that now actually, would have been handy)
Anyway mark in a horizontal line across the page to show your max height.
4) Basic Shape 2
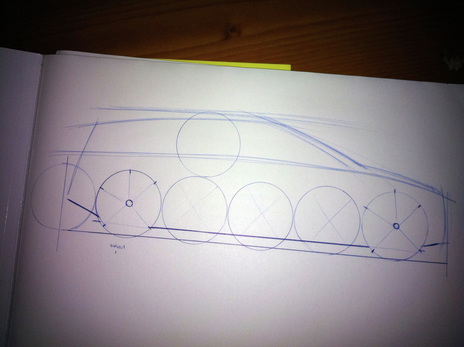
Marking in a basic shape here, this is quite hard for me as i'm just doing it for this tutorial, I don't have an idea of what I want or a brief or anything, but this is not about looking good, it's the basics!
So you can see (hopefully) that the proportion looks believable.
Another good reference point is to see if the angle of the A-Pillar points down towards the center of the front wheel (mines a bit off, but its not crucial)
So you can see (hopefully) that the proportion looks believable.
Another good reference point is to see if the angle of the A-Pillar points down towards the center of the front wheel (mines a bit off, but its not crucial)
5) Shaping It Up
Quite a lot going on here so I will try and break it down..
Refine the profile shape, give it a few bumps and curves, spoiler, light profiles etc and just try and make it look comfortable and make it flow well.
Block the side windows in, I have given mine a little jump at the rear to break up a long flat line that looks ugly. Also made the rear of the window mimic the angle of the spoiler section.
Wheel arches - I have drawn a larger circle around our wheels, this now becomes the arch/tyre. More about this below...
6) Small Details
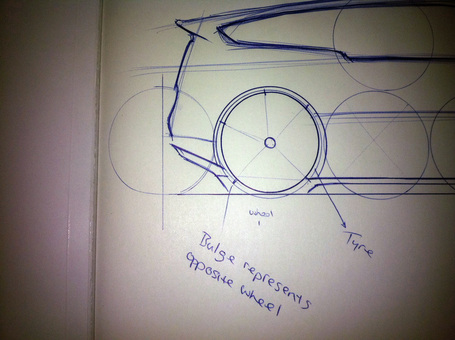
An outer circle represents a tyre or inner arch, this will be blocked or shaded to show the gap between the wheel and the body.
Also below the body of the car add another line which represents the underbody, and add a little curve down from this line following the roundness of the wheel. This represents the tyre and also the profile of the wheel on the opposite side of the car. This is needed to give the image more depth, even though this is a side view, it would have perspective in real life so we are giving it some here.
Also below the body of the car add another line which represents the underbody, and add a little curve down from this line following the roundness of the wheel. This represents the tyre and also the profile of the wheel on the opposite side of the car. This is needed to give the image more depth, even though this is a side view, it would have perspective in real life so we are giving it some here.
7) Getting Somewhere

Starting to look a lot nicer now.
Block in the outer circle (tyre) and the underbody of the car, done forget the bits at the front and rear that slope upward away from the ground to give ground clearance.
Also give your outer profile a bit more thickness and thought as we're about to add details.
Block in the outer circle (tyre) and the underbody of the car, done forget the bits at the front and rear that slope upward away from the ground to give ground clearance.
Also give your outer profile a bit more thickness and thought as we're about to add details.
8) Details and Style
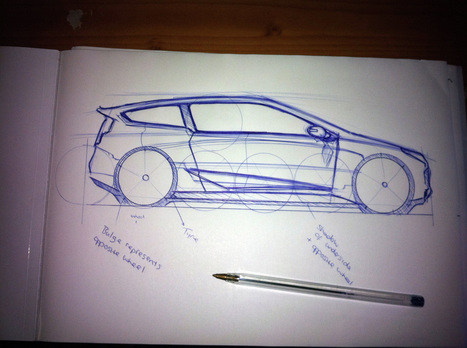
Now is the time to get a bit more creative. Give the design some style lines, some front and rear lights, some hints of vents or feature lines.
I have also added a wing mirror, door lines and a pillar to break up the large glass section. Also note that giving the window surrounds a thicker line gives the sketch a bit more realism. With the door lines remember to make them follow the bodywork..
For example the rear of the door kicks down after the 'shoulder' line, and then down, in with the bodywork and then back out again. But if you look at the front shut line, I have left it very vertical, it looks flat and unrealistic.. so follow your bodywork
9) Extras
So thats pretty much done, I usually just stop here and move on to another, get a few designs down and then pick some, scan them in and take them into Photoshop for some colour.
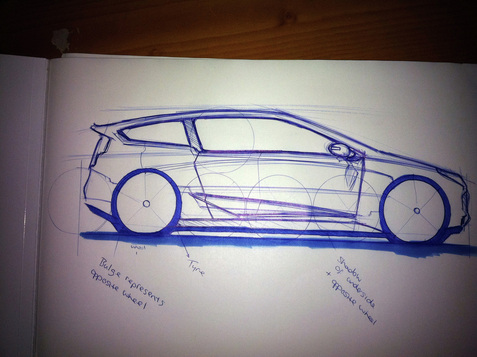
Here I have just quickly added a bit of colour using a few marker pens, but it makes things harder later on if you want to make changes if you don't get a good copy of the line drawing.
Here I have just quickly added a bit of colour using a few marker pens, but it makes things harder later on if you want to make changes if you don't get a good copy of the line drawing.
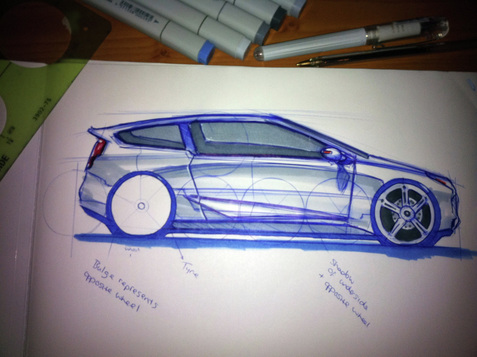
Adaptions
So there you go. That's how I create quick sideview sketches. I then render them up in Photoshop, or translate the design into a 3/4 Perspective drawing. I will get one done soon and get a tutorial up for that too as soon as I can.
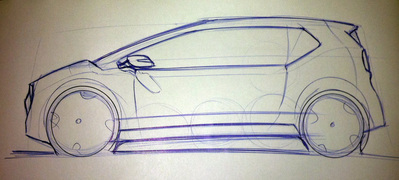
After doing the sketches above I did a quicker one of a smaller vehicle, using proportions that are not too different you can create different vehicles. Left shows a much smaller vehicle, it looks far more compact although the wheelbase is not much shorter, the car is higher off the ground and has a higher roof.
If you look closely you can see I left the construction process lines left in. If you want a much cleaner drawing just use the final stage sketch as an underlay and draw over it on a fresh piece of paper.